Light up the night - and the trails - with these tried and tested helmet-mounted lights for mountain biking
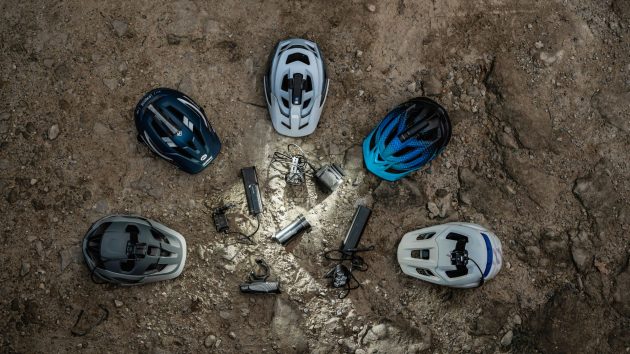
As the days shorten and the clocks go back, time to ride in daylight hours becomes severely limited outside of the weekend. Invest in a set of lights however, and you can open up a whole world of nocturnal riding activity. The best MTB light set-up should include a handlebar mounted light plus a helmet mounted light to give you the best visibility in the dark.
The best of the bunch is the Exposure Zenith MK2, which boasts a huge number of lumens to light up the night, with programmable modes.

Exposure Zenith MK2
Best mountain bike helmet light
Weight: 161g | Lumens: 510, 975, 2,100 | Rating: 10/10
Pros: Bright, sturdy, fully programmable
Cons: Pricy (but worth it), mounting issues with some helmets
The Zenith MK2 has a nicely machined aluminium body and clips onto the helmet using Exposure’s neat two-piece vent mount. This works with most helmets, but we’ve recently had a few issues with MIPs liners. These are often fixed to the EPS core, and to get the Exposure mount in place, we’ve had to bend the liner, which can crease it.
The Zenith MK2 puts out a maximum 2,100 lumens from its three LEDs and it has a slightly brighter, more focused beam than either the Cateye AMPP 800 or Magicshine RN 1500, and like all Exposure lights, the Zenith MK2 is fully programmable with nine built-in modes, helpfully written on the body of the light.
What makes this our test winning helmet light is the superb build quality, excellent programmability and the fact we could ride faster using this light than any other.
Read the full Exposure Zenith MK2 review

Sigma Buster 700
Perfect partner to a bar light
Weight: 148g | Max lumens: 700 | Rating: 9/10
Pros: Great value and good lens light.
Cons: Modest battery life.
It may ‘only’ have 700 lumens which can seem way underpowered in the modern era of 1,000s of lumens but… 700 lumens works just fine as a helmet light and is way brighter than the lights we used to make do with back-in-the-day.
You can also use this light little guy on your handlebars but one of the best things (for once) is the helmet mount of the Buster 700. The beam pool is suitably tight focus for a helmet light.
The main niggle is the modest run time. You can’t really turn it on and leave it for the duration of 90mins+ rides. So a bit of thought, planning and button pressing is required. Which is a price well worth paying when you’re not… er, paying very much money.
Read our full test review of the Sigma Buster 700

Exposure Diablo MK12
Impressively bright output, impressively light weight
Weight: 109g | Lumens: 1,850, 1,000, 500 | Run time: 1, 1.5, 3hrs | Rating: 10/10
Pros: Incredibly bright. Lightweight. Clever helmet mount.
Cons: Nothing
The light output is superb – it’s produces an incredibly bright white light that really picks up detail and it never got overpowered, not matter what bar light we used it with.
On full power, you get 1,850 lumens, but there seven different programmable modes using the high, medium and low settings, so you can really vary the output and run time. Turning off the Tap Mode is an option too, which we did a couple of times when riding through dense undergrowth because that can catch the light and tap it off.
Exposure makes a neat and lightweight vent mount for the Diablo that’s fully adjustable and low profile. Also included in the box is a bar mount box and a proper charger, not just a USB cable.
Read our full test review of the Exposure Diablo MK12

Gloworm X2 Adventure Lightset
Best value helmet light
Weight: 299g | Lumens: 400, 1,400, 2,000 | Rating: 9/10
Pros: Excellent value, customisable, remote control app
Cons: Battery life on full beam is low
The Gloworm X2 Adventure is similar in size and build to the Hope R4+, using a twin LED machined alloy head, but combined with a lighter and smaller two-cell battery. Included with the X2 Adventure is a plastic mount secured with a Velcro strap, but it’s a bit short and the mount is not that stable. In the end we used the GoPro adapter, which simplified set-up and made it more stable, but it does sit quite high.
The light puts out 2,000 lumens on full beam, and by using the new Link app, you can customise the individual settings and even create your own custom mode.
So while it’s a little high, and that helmet mounted battery/cable is not as convenient as the all-in-one designs, for just over £200 with this much stuff in the box, a new app and full customisation, the X2 Adventure is cracking value.
Read the full review of the Gloworm X2 Adventure Lightset

Hope R4+ LED light
Versatile and sturdy helmet-mounted light
Weight: 440g | Lumens: 550, 1,000, 1,500 | Rating: 8/10
Pros: Versatile (could work as handlebar light), spare mounts included, good beam pattern
Cons: No remote, hard to see fuel guauge
We tested the standard Hope R4+ model with a four-cell Li-Ion battery, but Hope also sells a R4+ ‘lightweight’ with a 2-cell battery for £230. Both use the ES (Energy Status) fuel gauge, which is button-activated and has five stages, so is easy to read, although not when it’s strapped on the back of your helmet.
It says 2,000 lumens on the tin, but the R4+ only has 1,500 lumens on full power. There are two light modes that you access via a quick or slow press during the initial turn-on phase. Trail mode (quick press) has the high, medium and low settings with the secondary mode getting a selection of flashing options.
Finish and build quality of the Hope R4+ is excellent. It has a good, even beam pattern and blasts out a lot of light. With all the extra clamps in the box it’s also versatile, although we’d like to see a lower profile helmet mount, and maybe a remote for the fuel gauge just to make better use of the ES technology.
Read the full review of the Hope R4+ LED light
Magicshine RN 1500
A lightweight light that packs a punch
Weight: 142g | Lumen: 300, 750, 1,500 | Rating: 8/10
Pros: Reliable and consistent, lightweight, crisp white light
Cons: Limited programmability
For a light that weighs just 142g and pumps out 1,500 lumens, the Magicshine RN 1500 really packs a punch. It runs off a Lithium-Ion battery that’s charged via a common USB-C cable, the port is located under a rubber bung on the back of the light. Run time is only about an hour on full power, but this extends to a claimed 10 hours on the lowest 300 lumen setting. We reckon the best compromise is 750; powerful but you get close to a three-hour burn time.
The RN 1500 uses a single LED, but it comes with an anti-glare lens that produces a uniform beam pattern and a crisp and white light. It’s slightly narrower focus than the Hope R4+ but there are no dark spots or a distracting central halo. We noticed the RN 1500 did run a little hotter than most, but this didn’t cause any issues during testing. In fact, the RN 1500 has been super reliable and consistent.
Cost per lumen is the best here, and while there’s limited programmability and the fuel gauge is pretty much redundant, it’s a great addition to a regular bar mounted light for cutting through the gloom.
Read the full review for the Magicshine RN 1500
How we test
Splitting this test into two means different testing procedures. For the helmet lights low weight is key, but being able to access the light’s settings while riding is also important. To have to remove the light or your helmet to change modes is inconvenient.
The beam of a helmet light needs to be more focused so that it can overpower the bar light to highlight obstacles on the trail. Run time needs to be roughly the same, obviously, although it makes sense to reduce the brightness on climbs, when you’re going slower.
With bar lights it’s all about the fittings – they should be multi-adjustable and accommodate different bar diameters. Battery attachments need to fit a range of bikes. A bar light should have a broad pool of light in front of the bike with no dark spots. To isolate both groups we test all the helmet lights with the same bar light and vice versa.

What to look for in the best mountain bike helmet lights: a buyer’s guide
If you’re riding in woods, forests, or even jungle, on tight singletrack with lots of turns, hidden drops and undulations, we’d recommend adding a helmet lamp to your night ride light set-up because it lets you look over that log (or snake pit) to see what’s on the other side. You can spot a turn, look round a corner and just get a better picture of what’s going, even on trails you know.
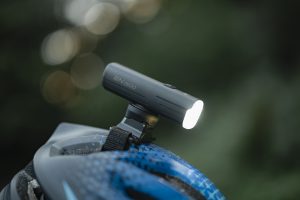
1. Helmet mount type
Usually most helmet lights attach using a plastic mount, held in place with two Velcro straps that loop through the helmet vents. However, some helmets have optional clips for GoPro cameras, and you can often get an adapter that lets you bolt the light straight on, eliminating the Velcro part.
2. Power
Light output is measured in lumens and the higher the number the brighter the light. Some manufacturers quote claimed lumens, but others state the measured lumens, which is a truer reflection of the actual light output. Most lights also have high, low, and medium settings, but some also get secondary modes that are accessed when you turn the light on. We’ve also started to see programmable lights that can be configured using an app or some sequencing built into the on/off switch.
3. Beam Pattern
We’ve included pictures of all the beam patterns to show what the light looks like on the trail. Ideally the helmet light needs a spot beam with good intensity to complement the bar light which should have a broad spread with soft transitions and edges and a pool around the front wheel for picking your way through technical terrain.
4. Fuel Gauge
To show remaining battery life a fuel gauge is essential, but it’s surprising how many lights don’t have one. The simplest are just flashing LEDs (green for good, red for bad) but some of the best use a read out or percentage countdown displayed on the back of the light.
5. Cable
If your helmet light connects to a cable, then ideally look for a coiled cable or a short option that you can add an extension. The worst is a super long fixed design that you’re going to have to coil up yourself and stow in your bag, leaving it vulnerable to getting snagged on your helmet, hair or low branches.
6. Remote
Usually this is fitted to the bar, near the grip. The idea is you don’t have to reach up to toggle the light on or off and you’re also more likely to use the different power levels and preserve battery life. It’s really handy on a helmet light, less so on the bar because you can just reach across.